DIY Halloween table decorations can make a party feel special without taking over the whole table. These three projects use paper, napkins and mini pumpkins: bat napkin rings, glowing ghost cups and pumpkin place cards. Make them ahead, or leave the name tags for guests to decorate when they arrive.
This plan dresses six place settings and adds three small ghost lights. The quantities below are for decorations, not food. Keep the center of the table open for serving dishes and give each guest enough room to eat.
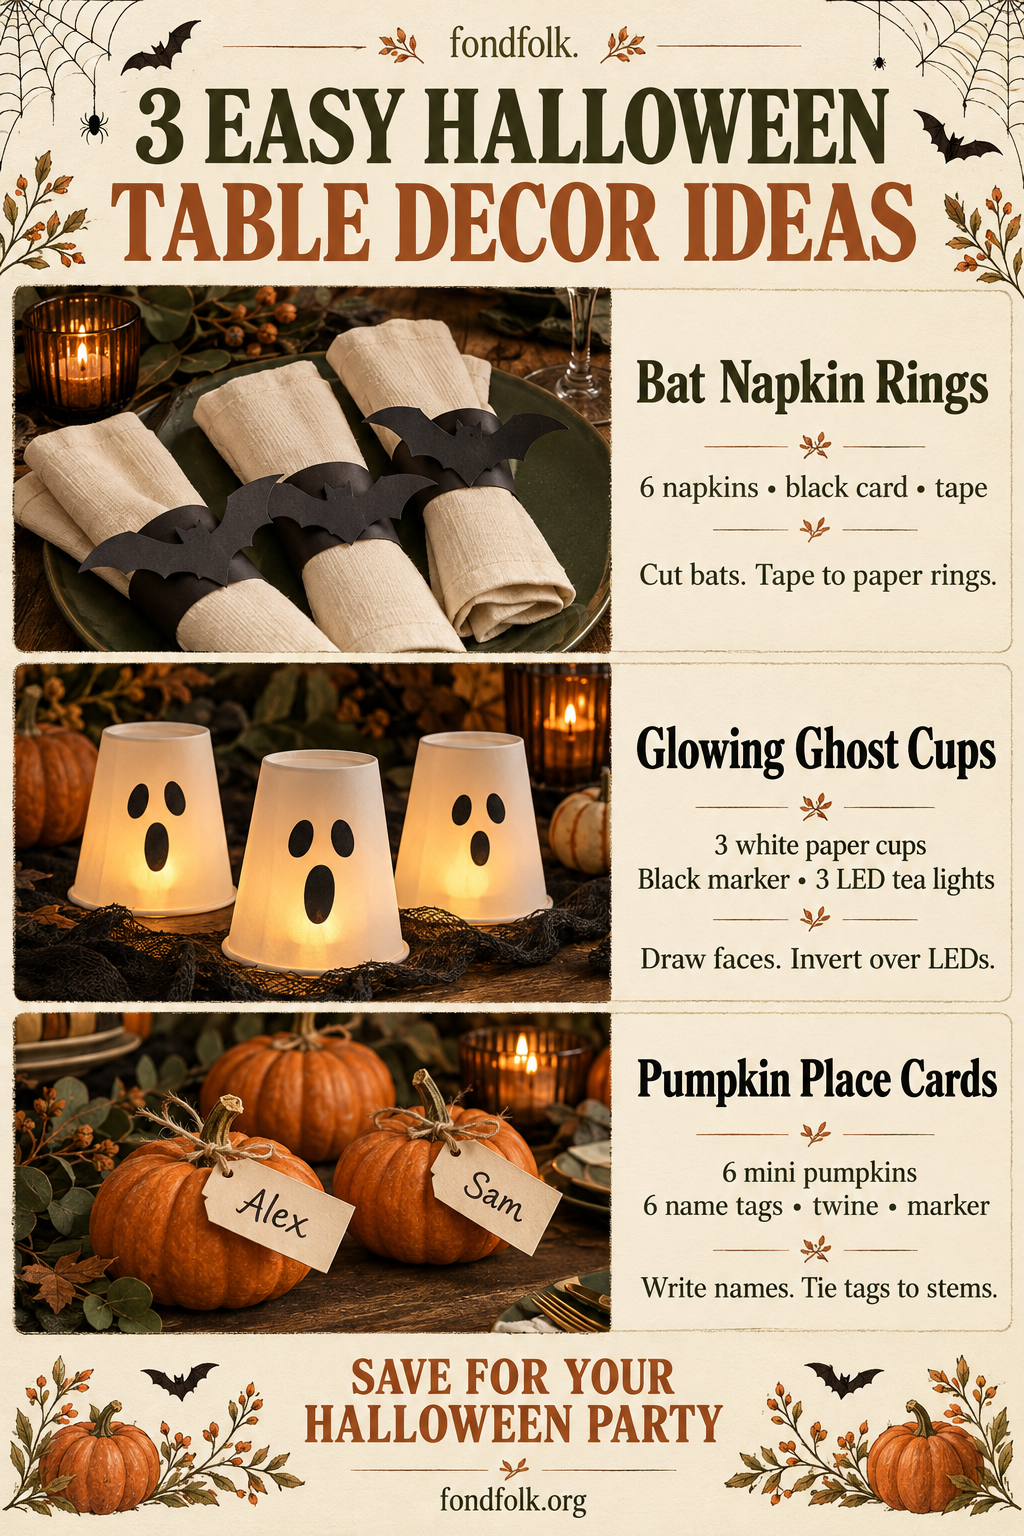
1. Make bat napkin rings
A black paper bat turns a rolled napkin into a little Halloween detail. Fold each bat down the middle before attaching it so the wings lift slightly from the ring.
Supplies for six:
- 6 cloth or sturdy paper napkins
- 2 sheets of black cardstock, letter size or A4
- Double-sided tape or ordinary tape
- Pencil, ruler and scissors
Cut six cardstock strips, each about 1 inch wide and 7 inches long. Roll a napkin, wrap one strip loosely around it and tape the overlapping ends together. Check the first ring before making the rest; a bulky cloth napkin may need a longer strip.
Draw a simple bat about 4 inches wide on the remaining card: a small body, two pointed ears and broad wings with two shallow scallops along each lower edge. Cut it out and use it as the pattern for five more. Crease each body gently, then tape the center to a paper ring, leaving the wings free. Slide the napkins through and place one on each plate.
Make the rings the day before and store them flat enough that the wings will not bend. For a group activity, prepare the cut pieces first and let guests assemble them. An adult can handle the scissors for younger helpers.
2. Make glowing ghost cups
Upside-down white paper cups become little ghosts when you add faces and place them over battery-operated lights. Thin, plain white cups usually show the glow better than thick or heavily printed cups; try one before decorating the whole set.
Supplies for three:
- 3 plain white paper cups, approximately 8–12 ounces each
- 3 cool-running LED tea lights with securely closed battery compartments
- 1 black marker
Turn each cup upside down on a flat surface so its broad open rim is at the bottom. Draw two eyes and a small oval mouth on the side, keeping the face upright in this position. Let the ink dry.
Switch on the LED tea lights and place one beneath each cup. The light should fit comfortably inside without touching the paper. Group the ghosts along the back of a buffet or between serving dishes, leaving space around them. Lower the room lights slightly to make their glow visible.
Use battery-operated LED lights only—never a candle or other flame inside a paper cup. Keep the lights and their batteries out of children's reach, and switch them off after the party. If the cups block too much light, use the same faces as unlit decorations instead.
3. Tie pumpkin place cards
Mini pumpkins double as place-card holders and table decorations. A simple tied tag gives guests a clear seat without needing a slot, a skewer or glue.
Supplies for six:
- 6 mini pumpkins with intact stems
- 6 pre-punched paper name tags
- About 6 feet of kitchen twine or thin ribbon
- 1 marker and scissors
Wipe the pumpkins clean and dry them. Write one guest's name on each tag in large, dark letters. Cut the twine into six lengths of about 12 inches, thread a piece through each tag and tie it loosely around a pumpkin stem. Let the tag face forward so the name is easy to read.
Place a pumpkin above each plate, leaving the napkin bat visible. For a casual party without assigned seats, leave the tags blank and put a marker beside them so guests can write their own names. Guests can take their pumpkin home afterward.
Arrange the table without crowding it
Start with the plates, then add the napkin rings and pumpkin names. Put the three ghost cups where they will not interfere with passing bowls or reaching for glasses. A cream tablecloth, dark olive napkins and the natural orange of the pumpkins are enough color to bring the projects together.
Make the paper rings and name tags ahead; add the pumpkins and switch on the ghost lights shortly before guests arrive. Keep spare tape nearby for a loose wing or tag. Afterward, switch off the lights, store the paper bats dry and reuse any undamaged decorations.
For food to go with the table, try three easy Halloween party food ideas. Or use the Halloween party menu to choose a mix of snacks, sweets and alcohol-free drinks.