Start with six places and one centerpiece
This plan makes 6 web placemats, 6 utensil pockets and 1 paper pumpkin. Keep the background simple: cream plates, dark green paper and orange card are enough. You can make just the pockets for a buffet or just the pumpkin for a small dessert table.
Gather a ruler, scissors, a hole punch and the supplies listed below. Use self-adhesive paper eyes for the pockets; if your paper eyes are plain, add a glue stick or glue dots to the toolkit. An adult should handle cutting and punching wherever supervision is needed. Keep loose paper fasteners in a small dish away from serving plates.
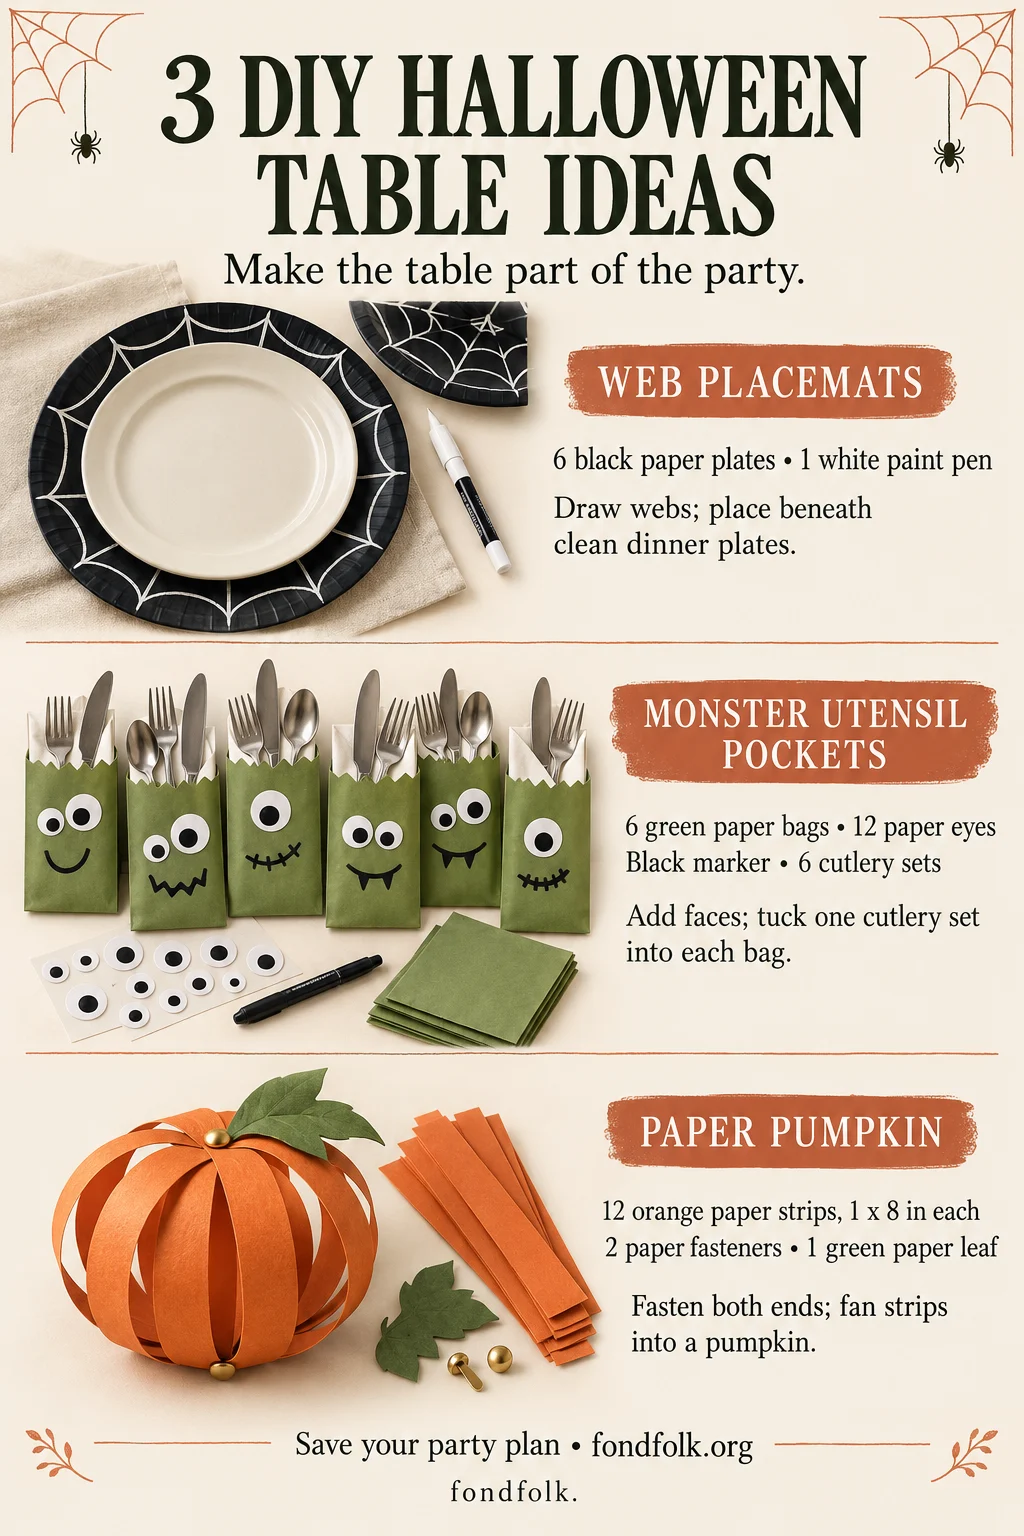
1. Paper-plate web placemats
Makes 6 decorative chargers. Choose black paper plates larger than the clean dinner plates that will sit on top, so the web remains visible around the edge.
- 6 black paper plates
- 1 white paint pen
- 6 clean dinner plates for serving
- Draw several white spokes across the rim of the first black paper plate. Connect neighboring spokes with gently curved lines to make a web.
- Check the look with a dinner plate resting on top. If it covers most of the web, draw the remaining lines closer to the outside edge.
- Repeat for the other five chargers. Let the paint dry completely according to the pen instructions, then place a clean dinner plate over each one.
Treat these as decorations beneath separate plates, not as painted food-serving surfaces. There is no need to cover the hidden center with a detailed drawing. A few bold lines at the rim will show more clearly than a crowded pattern.
2. Monster utensil pockets
Makes 6. Small, clean paper bags hold the cutlery together and give every place a different expression.
- 6 green paper bags
- 12 paper eyes, preferably self-adhesive
- 1 black marker
- 6 cutlery sets
- Lay the bags flat. Add paper eyes near the upper half of each bag, leaving enough room below for a mouth. Two eyes per bag uses all twelve; a one-eyed monster simply leaves a spare.
- Draw smiles, zigzags or small fangs with the marker. Keep the decoration on the outside of the bag and allow the ink to dry.
- Open each bag and tuck in one clean cutlery set with the handles inside and the usable ends above the opening. Place one pocket beside each plate, where it can be picked up easily.
Choose bags that fit the cutlery without tearing. If a bag is too tall, an adult can trim the opening before decorating. Use the appropriate utensils for your guests; the pocket works equally well with a fork and spoon or a complete set.
3. Paper-strip pumpkin centerpiece
Makes 1 small pumpkin. Use flexible orange paper or light cardstock; very stiff board is harder to curve into a rounded shape.
- 12 orange paper strips, each 1 x 8 inches
- 2 paper fasteners, also called split pins or brads
- 1 green paper leaf
- Stack the twelve strips neatly. Punch a hole near each end, about 1/2 inch from the edge. Punch a small hole at the base of the green leaf as well.
- Push one fastener through all twelve holes at one end and spread its legs on the back. Align the holes at the other end, add the leaf on top and secure that stack with the second fastener.
- Bend the joined stack gently, then fan the strips around the fasteners until they form a hollow pumpkin. Adjust the spacing and press the lower end gently so it rests on the table.
Leave the fasteners loose enough for the strips to turn, then flatten their legs after arranging the pumpkin. The leaf attaches under the top fastener, so it does not need a separate dab of glue. If the pumpkin leans, widen and redistribute the strips before trying to force it upright.
Leave room for the party
Put the pumpkin in a clear spot where it will not block guests from passing dishes. Keep paper decorations away from heat, flames and splashes. Set serving trays on a separate surface if the table is small, and use the utensil pockets as part of the buffet instead of squeezing them beside every plate.
After the party, save clean, dry paper pieces for another occasion and separate them from used food-service items. The green pockets can become take-home craft examples, while the pumpkin folds flatter once you bring the strips back together.
For an edible activity to go with the table, try ghost cupcakes, graveyard brownies and mummy pastries. For more decoration options, browse our bat napkin rings, ghost cups and pumpkin place cards.