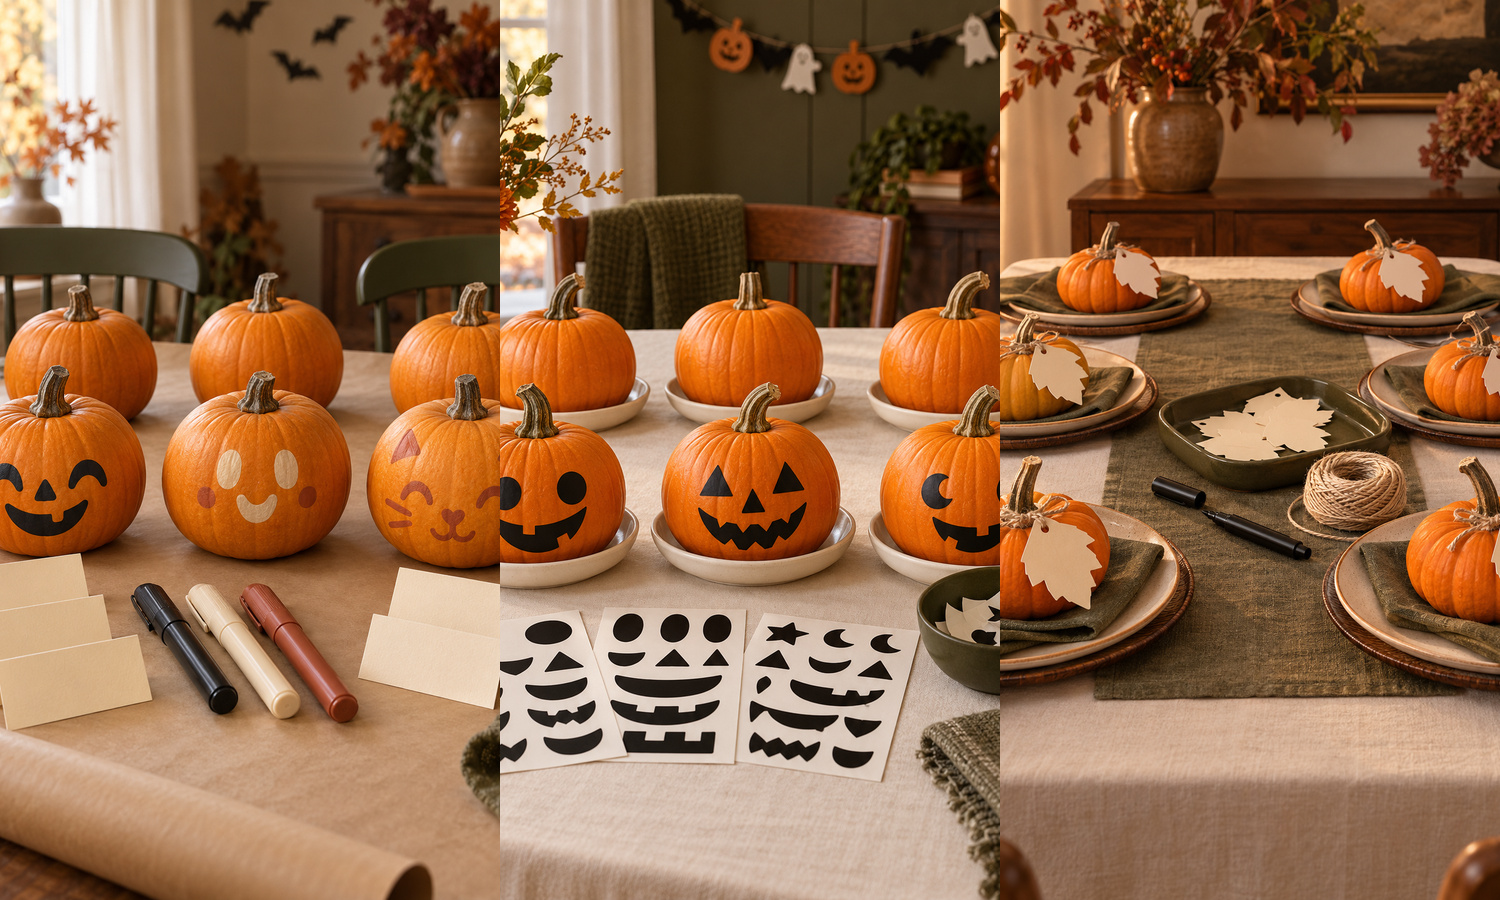
Mini pumpkins make an easy Halloween party activity because guests can decorate them at a table and carry the finished project home. This plan gives you three choices: painted pumpkin faces, removable sticker faces and leaf-tag pumpkins that double as place cards.
Each activity makes six pumpkins. Set up one station for a small gathering or prepare all three for a larger decorating table. None requires carving tools, exposed flame or wet glue.
Prepare One No-Carve Pumpkin Table
Choose firm mini pumpkins with dry stems and no soft spots. Wipe away loose dirt with a slightly damp cloth, then let the pumpkins dry completely before the party. Paint markers and removable shapes adhere more reliably to a clean, dry surface.
Cover the table with kraft paper and give every guest a clearly marked workspace. Keep drinks and serving dishes on another table so the decorating supplies stay separate from party food. Put one finished sample at each station, but leave enough room for guests to create their own faces and patterns.
Use age-appropriate, water-based supplies and follow every product label. Painted or sticker-covered pumpkins should be treated as decorations rather than food. Keep small vinyl pieces and cotton twine away from children who may put them in their mouths, and supervise the activity as needed.
1. Painted Mini-Pumpkin Faces
Makes: 6 decorated pumpkins
Supplies
- 6 clean, dry mini pumpkins
- 3 water-based paint markers in black, warm cream and muted terracotta
- 1 kraft-paper table cover
- 6 blank warm-cream name cards
- 1 soft cleanup cloth
Give each guest one pumpkin and one name card. Ask everyone to write their name on the card before decorating so finished pumpkins do not become mixed up while the paint dries.
Shake, prime and use the markers exactly as their labels direct. Draw broad eyes and a simple mouth rather than filling the entire pumpkin with paint. Wide shapes are easier to see across the table and leave less wet paint to smudge.
Brief instruction: Draw simple faces on dry pumpkins; set each beside its name card and let the paint dry as directed.
Keep the pumpkin upright while working and avoid painting the base, which should sit flat on the table. If a line goes somewhere unexpected, turn it into an eyebrow, cheek or patch rather than rubbing wet paint across the skin. Put the cap back on each marker between turns.
Move finished pumpkins to a separate drying surface with their name cards. Drying time varies, so follow the marker label instead of promising a fixed wait. Do not stack or bag the pumpkins until every painted area feels fully dry.
2. Sticker-Face Pumpkin Bar
Makes: 6 decorated pumpkins
Supplies
- 6 mini pumpkins
- 6 shallow warm-cream saucers
- 3 sheets removable black vinyl face shapes
- 1 small bowl for backing scraps
- 1 soft cloth
This station works well for guests who want a quick project or would rather skip wet paint. Before the party, prepare three sheets of large eyes, noses and mouths. Keep the shapes broad enough to lift with fingertips, and avoid very small pieces for young guests.
Put one clean pumpkin on each saucer. The saucer defines each workspace, keeps pumpkins from rolling into one another and gives guests an easy way to move the project without touching the stickers.
Brief instruction: Wipe pumpkins dry; press on removable eyes and mouths, then park each pumpkin on a saucer.
Guests can test a face by placing the shapes lightly before pressing the edges flat. Mix round eyes, triangles, moons and different mouths so the same sheets can make friendly, surprised or spooky expressions. Drop every peeled backing into the scrap bowl as soon as it comes off.
If a shape lifts on a deep pumpkin ridge, move it to a flatter section instead of forcing it across the groove. At the end of the party, guests can carry the pumpkin on its saucer. Remove the vinyl before composting the pumpkin or using it for another purpose.
3. Leaf-Tag Place Pumpkins
Makes: 6 place settings
Supplies
- 6 mini pumpkins
- 6 warm-cream cardstock leaf tags
- 6 pieces cotton twine, each 18 inches long
- 1 black washable marker
- 1 dark-olive display tray
Leaf-tag pumpkins begin as a short decorating activity and finish as table place cards. Cut the tags before the party so guests only need to write, tie and arrange. Punch one hole near the base of each paper leaf, leaving enough cardstock around the hole that it will not tear easily.
Write one guest name in large letters on each leaf. Add a tiny bat, star or pumpkin outline if there is room, but keep the name readable. Thread one twine piece through the hole and tie it loosely around the pumpkin stem.
Brief instruction: Write one name per tag; tie it loosely to the stem and place one pumpkin at each seat.
Do not pull the twine tight or use the stem as a carrying handle. Lift the pumpkin from underneath and keep the paper tag away from wet glasses or serving dishes. Display the completed pumpkins together on the dark-olive tray until it is time to set the table.
Place one tagged pumpkin above each plate or on a folded napkin. If you are not assigning seats, write short party words such as BOO, EEK or GUEST instead of names and let everyone choose one.
Arrange the Three Activities as One Party Table
Put the sticker station first because it is the quickest and stays dry. Place the paint markers in the middle on top of the kraft paper. Keep the leaf tags and twine at the far end, where finished painted pumpkins will not brush against them.
Give each guest only one pumpkin at a time. Refill the table from a separate supply tray rather than crowding all 18 pumpkins around the active workspaces. Reserve another table, shelf or counter as the finished-project area.
These activities pair well with Fondfolk’s Halloween party craft stations and Halloween party table games. Use the crafts when guests want a longer project and the games when the decorating table needs time to reset.
After the Party
Cap the markers, collect every vinyl backing and return unused tags and twine to their containers. Let painted pumpkins dry in open air as the product label directs. Send each project home upright in a small paper bag only after the surface is dry.
Remove stickers, twine and cardstock before composting or discarding the pumpkins. Because the finished pumpkins have been handled and decorated, treat them as display pieces rather than ingredients. The result is a practical Halloween activity, a coordinated table detail and a small take-home project in one.